Hardscaping elements, such as pavers, patios, walkways, and retaining walls, add both beauty and functionality to your outdoor spaces. They are designed to withstand various weather conditions and heavy use. However, over time, cracks and damage can occur due to natural wear and tear, shifting soil, or extreme weather events. Repairing cracked pavers or patio pavers is essential not only for maintaining the aesthetic of your landscape but also for ensuring safety and functionality. In this guide, we will explore how to repair cracked or damaged hardscaping, offering practical tips and solutions to restore your outdoor surfaces.
Understanding the Causes of Cracked or Damaged Hardscaping
Before diving into the repair process, it is important to understand the underlying reasons for cracked or damaged hardscaping. Patio pavers, for instance, may crack due to various factors, including ground movement, freeze-thaw cycles, heavy vehicle traffic, and improper installation. When the soil beneath the pavers shifts or settles, it can cause the pavers to sink or crack. Additionally, if the pavers were not properly laid, or if there is insufficient drainage, water can seep under the pavers and cause further damage. Regular maintenance and timely repairs can help prolong the life of your hardscaping, but it is important to address the root cause of the damage to avoid future issues.
Assessing the Extent of the Damage
The first step in repairing cracked pavers or patio pavers is to assess the extent of the damage. Not all cracks require immediate repair, and some may be minor cosmetic issues that can be easily fixed. However, large cracks or significant shifting in the pavers can affect the stability and safety of the entire surface. Begin by walking through your outdoor area and inspecting the damaged sections closely. If you notice any loose or uneven pavers, or if the cracks are deep and large, it is best to address the problem promptly to prevent further deterioration.
Once you’ve identified the damaged pavers, determine if they can be replaced individually or if the entire section needs to be reinstalled. Small, isolated cracks can often be repaired with filler, while larger cracks or sinking pavers may require more extensive repairs, such as lifting and releveling the pavers. Keep in mind that the damage could also be a sign of an underlying issue with the foundation, which may require professional intervention.
Step-by-Step Guide to Repairing Cracked or Damaged Pavers
Repairing cracked patio pavers or hardscaping elements is a relatively straightforward process that you can tackle yourself with a few basic tools. Here is a step-by-step guide to help you restore your damaged hardscaping.
Step 1: Gather Necessary Tools and Materials
Before beginning the repair process, gather all the tools and materials you will need. For repairing cracked pavers, you will typically require the following:
- A hammer and chisel
- A rubber mallet
- Replacement pavers (if needed)
- Paver sand or polymeric sand
- Concrete filler or crack repair compound
- A broom or brush
- A level or straightedge
- A pressure washer (optional)
Step 2: Remove the Damaged Pavers
If the damage is localized to a few pavers, you can remove the cracked or damaged pieces first. Use a hammer and chisel to gently lift the damaged paver. Be careful not to damage the surrounding pavers during this process. If the pavers are firmly embedded, you may need to use a pry bar to lift them. Once the damaged paver is removed, inspect the area underneath to ensure that there is no further damage to the base material. If the base is uneven, it may need to be leveled before reinstalling the pavers.
Step 3: Prepare the Surface
If you’re simply replacing a cracked paver, the next step is to prepare the surface beneath. First, check the base material for compaction. If the area is uneven or loose, it’s essential to add a layer of compacted gravel or sand to create a stable foundation. Use a tamper to compact the material and ensure it is level. After this, you can apply a thin layer of sand to the surface. This layer will help the new paver settle into place and prevent shifting in the future.
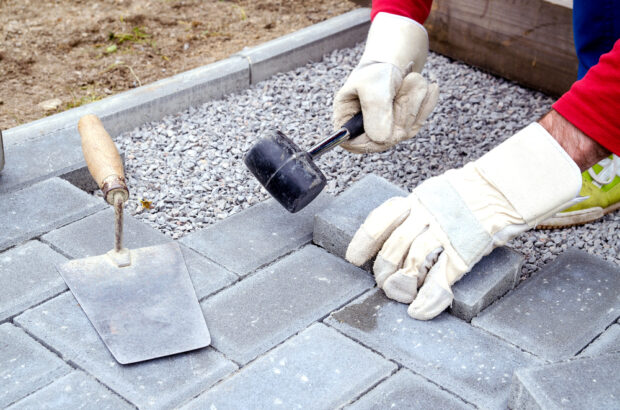
Step 4: Install New Pavers or Repair Cracks
For cracked pavers that you’re replacing, carefully place the new paver into the prepared spot. Ensure that it is level with the surrounding pavers and aligned properly. Use a rubber mallet to tap it gently into place, making sure it sits flush with the adjacent pavers. If you’re repairing a cracked paver instead of replacing it, you can apply a concrete filler or crack repair compound to fill in the gap. Use a putty knife to smooth the compound into the crack, ensuring that it fills the crack completely.
Allow the filler to dry and cure according to the manufacturer’s instructions. Once the filler is set, you can use a small sanding block or a trowel to smooth the surface, making the repair as seamless as possible. If the repair is not smooth, you may need to apply a second layer of filler and repeat the process.
Step 5: Refill Gaps and Seal the Surface
Once you’ve installed the new pavers or repaired the cracks, you’ll need to refill the gaps between the pavers. Sweep paver sand or polymeric sand into the joints between the pavers to stabilize them and prevent weed growth. After filling the gaps, use a broom to remove excess sand and ensure that the joints are properly packed. For added protection, consider sealing the entire hardscaping surface. A high-quality paver sealer can help prevent future damage and extend the lifespan of your patio or walkway. It also adds a polished, finished look to your outdoor space.
Preventing Future Damage to Your Hardscaping
Repairing cracked or damaged hardscaping is an essential part of outdoor maintenance, but it’s equally important to take steps to prevent future damage. Regular upkeep and maintenance can go a long way in preserving the appearance and functionality of your hardscaping elements.
First, ensure proper drainage around your pavers and patio. Water that pools beneath the surface can weaken the foundation and cause pavers to shift or crack over time. You can achieve proper drainage by installing gravel or sand under the pavers and ensuring that the ground slopes away from the hardscaping to encourage water runoff.
Additionally, consider applying a sealer every few years to protect the surface from weather-related damage and wear. The sealer helps protect against UV rays, moisture, and stains, ensuring that your patio or walkway remains in good condition. Lastly, inspect your hardscaping regularly for any signs of damage, such as cracks or loose pavers, and address any issues promptly to prevent further deterioration.
Conclusion
Repairing cracked or damaged hardscaping, such as patio pavers and walkways, is a manageable task that can be done by most homeowners with the right tools and approach. Whether you’re replacing a single cracked paver or repairing several sections of your patio, following the proper steps ensures a smooth and successful repair. Understanding the causes of damage, assessing the extent of the issue, and using the right materials will help you achieve durable and lasting results. By performing regular maintenance and addressing minor issues as they arise, you can keep your hardscaping looking beautiful and functional for years to come.
Need a Hardscape Contractor in Raymore, MO?
Since 2004, MSE Hardscape Design and Installation has been the expert provider and installer of retaining walls for the city of Kansas City and its surrounding areas. We are dedicated to providing exceptional and professional services to our valued customers. Our specialty lies in the design, installation, and maintenance of retaining walls for both commercial and residential spaces. We offer many services to meet the needs of our customers, including the building and installation of segmented block and large-block retaining walls, interlocking pavers, fire pits, outdoor kitchens, and pizza ovens. Our goal is to create an oasis out of your backyard or commercial space! Call us today for a consultation!